Paper crafts are a wonderful way to have time to spend time with friends and children, make an original gift and simply improve the small motility of the hands. Origami birds create most often, because their schemes for beginners are most clear, and the product obtained at the exit is quite original and presentable.
The originally actively in the technique of origami perform cranes, swans or pigeons. Owls, seagulls, etc. Representatives of fauna are less popular, and more often precisely because of the complexity of working with them. There are certainly a lot of schemes for each of the birds: they differ in the desired level of preparation, and according to the total appearance of the figure.
All of them imply a color or simple paper that does not break from too frequent manipulations at a particular point, but it will be easily led by deformation. In addition, it is often necessary to resort to the help of a simple pencil, ruler, transport and scissors. However, in some algorithms, these devices may not be needed.
Swan from paper make the easiest way. Often you can notice such a bird as a table serving item, when large napkins are in a similar way, putting them on an empty dish.
For the manufacture requires a large sheet of paper in the form of a square on which the central line is scheduled, and the side angles are converted to it. The figure resembles an elongated rhombus. In the triangles, which amounted to its long part, the internal angles are rejected, and the figure on the median vertical is again folded in half.
The most acute angle (lies at the base) diagonally bends so that this part formed perpendicular to the base, and its tip is sent to the bottom to the side. Head and neck swan ready. The tail is enough on parallel diagonals twice the harmonica, and work with this bird origami is completed.
Make a pigeon: master class with schemes
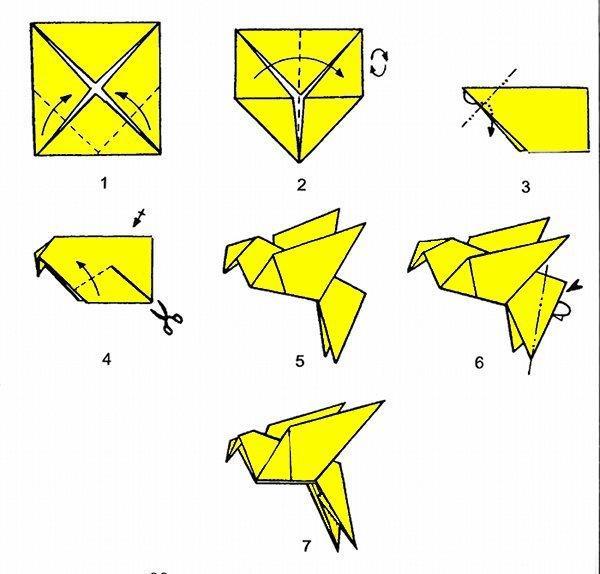
Pigeon - symbol of the world and the most simple in the execution of the origami bird. There are certainly a lot of schemes for him, and beginners are invited to use the one that includes only 7 steps. Equipped with color paper, cutting out a square 20 on 20 or a little large sizes so that there are no special difficulties in addition. At the initial stage, it will be necessary to arrange it in front of them as a rhombus, and then get all the edges inward, combining the vertices in the center. There should be a square envelope.
Now the lower corners of the figure are converted to the central line and bend, turning the square into the pentagon. After that, on the same median vertical, it develops, and the paper turns. Her biggest side looks up, sharp corner - left, diagonal goes down. At this step, the sharp angle is bended, which will be the beak pigeon: it is advisable to stick to a diagonal of 45 degrees. However, it should be understood that it goes not back or forward, but it is inserted inwards, between the halves of the paper. And the top line will now argue on the contrary.
Next will need scissors: at an angle of 45 degrees at the lower straight angle, an incision-diagonal is made. If it is difficult to determine its length on the eye, it is possible to find the middle of the figure to find the middle of it along the base along it, and the intersection point of this line with a diagonal of a direct angle will be the end of the end. The left part from it is fenced out, forming a pigeon wing: it needs to be done on both sides.
The right remains lowered: this is the tail of the birds, with which it is necessary to produce another 1 manipulation. Of the acute angle to the upper base, to put a diagonal, measuring an angle of 20 degrees, after which it is to get inside the edge of the figure on this line. On this, the creation of dove origami from paper is completed.

You can use Dr. Scheme of the same bird that includes 11 steps, but it may seem simpler than the previous one. A sheet of paper is selected with the same parameters, and is also located in the rhombus projection, after which it consists on the vertical line in half and straightened back. Then the side parts must be turned to the same middle alternating them with the edges, and the top will bend back.
The next step is the lines mark: the side corners of the received triangle are folded to the middle and straighten, then each of them is strung out, but only on the front side, so that the untouched peak remains. She will be pigeon at the final stage.
The lower ends of the side bends need to be removed inside, the angle for which it is done is the minimum - 7-10 degrees. After that, in the middle vertical, the figure is folded by the movement: i.e. The sides that were in the field of your vision should remain in sight, being outdoor. Then the product turns into the middle line for which its flexible, looked diagonally up: This is the back of a bird.
It will only be left inside the head - the top corner, and fold the tail. The latter is reproduced as follows: First, the part is reinforced and straightens on the line close to the base, then by the one that is 0.5-1 cm (depending on the initial paper size) to the right of it. Now thanks to the outlined lines it is easy to drive the last movement of the finger so that it disappears inside the bird. Simple dove origami ready.
Origami: Bird of happiness with your own hands
There were legends and songs about the bird of happiness, and for sure, many at least once were interested in how she looks like. However, its appearance in the presentation of each people will be varied: in particular, in Japan, the bird of happiness is called the crane. In this East Asian country there is a belief that 1000 such origami birds are able to fulfill even the most unrealistic but intimate desire. Of course, this is just a beautiful fairy tale, but perhaps, by the time, the 1000th cranes will turn out of the hands, and the long-standing dream will come true?
To create such a bird, paper will need, best color from both sides. The size of the sheet is preferable 18 per 18 or 24 to 24, since with smaller parameters it becomes more difficult to work out each item, if there is no significant experience in the origami. And the last nuance, which is important to consider, choosing paper, is the degree of its softness and strength. Often you have to bend several times and break 1 line, after which some materials begin to ride at this place, which reduces the result to "no".
- According to the classic scheme of the Bird of Happiness Origami, the square is placed so that the rhombus resembles, after which it is folded in half twice and folded back, each time forming a rectangle. Such a move made it possible to outline auxiliary lines. Now it is necessary to turn over the paper and start bending again, but already on diagonals of the rhombus, getting triangles every time. This created the latest auxiliary lines.
- The sheet turns over again, and then on its center must be pressed with a finger, raising all the corners up and combining them: i.e. Paper "will" finger, which is immediately removed. Paper standing on the surface by its base is the same square, but in the rhombus projection. It should be turned over so that the "deaf" angle, which is the basis for which was pressed, turned out to be at the top, and the divergers looked down.
- A new stage - the sides of the rhombus are required to be adjusted inside, aligning the edges along the center line. After that they will be fused back. The same should be done for the upper "deaf" angle: omit it down and straighten again. Mounting lines are ready. The most interesting and important point: For the lower edge of the upper layer, it should be pulled by raising it, as a result of which the lines should be created by the lines, and the hollow is not completely closed rhombus. The same actions are made for the opposite (rear) side.
- Now an externally, a figurine resembles 2 elongated rhombus combined with a single base. Continuing it to hold in this position, it is necessary to fold the sides into the middle line again, to the midline: for each rhombus it is done separately, they are not combined in any case at this stage. Then, each of the parts of the pione is important to bend up and dilute on the sides are not stronger than 45 degrees, then straighten again.
- According to the received lines, the ends of the rhombus again will need to bend, but already inside, and from any of the sides, the tip is also bent at 45 degrees - it will be a bird's head. The final step becomes lowering "wings", i.e. The upper ends of the rhombus, as well as flattening the central "hump". Japanese Bird of Happiness is ready for the flight for a dream!
Zhuravlik, which brings happiness: video tutorial
See also:
- Boomerang paper with your own hands
- Paper flowers do it yourself
- How to make a swan from a tire?
- How to make a dove of paper?
- Crane of happiness from paper
- How to make a frog of paper?
- Claws or nails from paper
- How to make a dinosaur of paper with your own hands on Origami technique?
When you completely master the schemes, it will be possible to move to more complex fire-bird variants, the original union, etc. The number of algorithms for creating birds origami exceeded 100, so you definitely find yourself an idea in the shower.
Origami Zhuravlik is one of the most basic Origami crafts that you can do is not only a simple paper handicraft, it also has a long and beautiful story. Of all the various works of art that are made with the help of paper, it seems that a simple crane is still very popular and very close to the hearts of people. The first time I saw the origami caravlik when I studied in the first grade, and my teacher taught the whole class how to do them . But I never got it to gather it, I was so upset because I could not make a crane that I decided that I hate Origami and would never give time to this meaningless, in my opinion, the lesson. But everything changed several years ago, when I went to Japan. I left the plane and went to eat, but suddenly noticed that at the airport was a museum dedicated to the art of origami. Of course, I decided to go there. When I entered the museum, I just fell in love! Everything was so beautiful! I was so impressed that I was in the museum within a few hours, just looking at all the various origami crafts. I visited the museum three more times before Japan left and even learned to make the origami heart. On my last visit to the museum, I bought a book and paper for Origami to pick up all this home, as I was very interested in this art and I really wanted to collect various new creations. Now, after a while, I learned to do different patterns of fish, birds and animals, and of course origami caravlika-traditional and magical! There is even an ancient legend in Japan, which says that if you collect 1000 origami caravlikov, then crane will arrive at you and fulfill your desire. There is one sad story related to the origami caravlik about the girl, which was only two years old, when an atomic bomb was dropped, it was just a mile from the epicenter of the explosion. Over the years, it began to become bad because of the illness, which was caused by a bomb explosion. She spent a lot of time in the hospital, but then I remembered the old legend about the crane and decided to try to make 1000 cranes, but died before it was able to achieve my goal. For this reason, I always think about it every time I do the origami caravlik, and I always pray for the world on Earth.
On this page you can find out how to make the origami bird - Bulbie from paper. This is a pretty simple origami scheme it consists of ten stages.
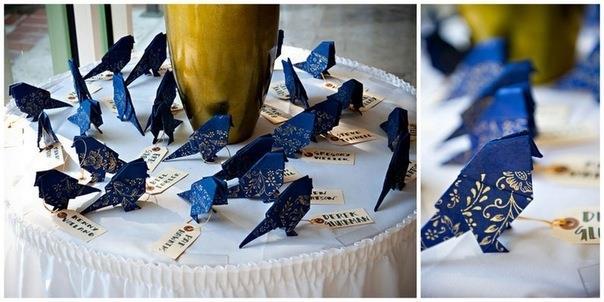
Ready bird of paper Showing on the left or on the last figure of the origami scheme for children. In order to make origami bird You can use paper napkins with a pattern or colored paper. Figure at the bottom of the page shows the idea of \u200b\u200bdecoration using paper birds.
How to make origami bird - paper bird
In order to make a birdMake a square sheet of paper. The figure below shows the scheme, how to fold from paper origami birds.
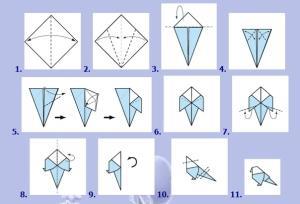
Fold a sheet of paper twice in half as shown in the first origami figure so that the folds designated by dotted lines are on the sheet of paper.
Bend paper sheet, as shown in the figure at number two. The corners of the left and right half origami must come together in the center.
As shown in the following figures, remove the left and right corners. Figure below shows the idea of \u200b\u200bscenery using blue paper birds.
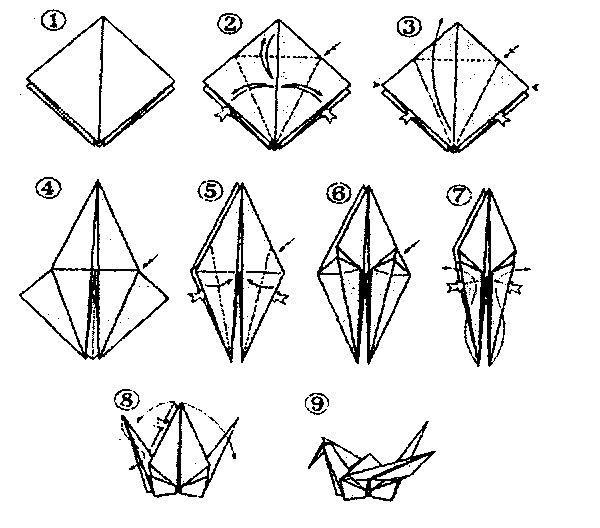
Origami scheme "Zhuravlik"
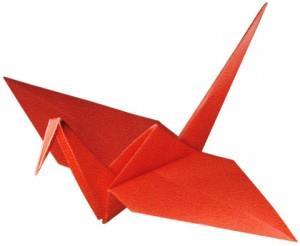
Perhaps "Zhuravlik" is the most that neither there is a classic form origami. With the help of the diagram you can easily fold this beautiful bird. Origami scheme "Zhuravlik":
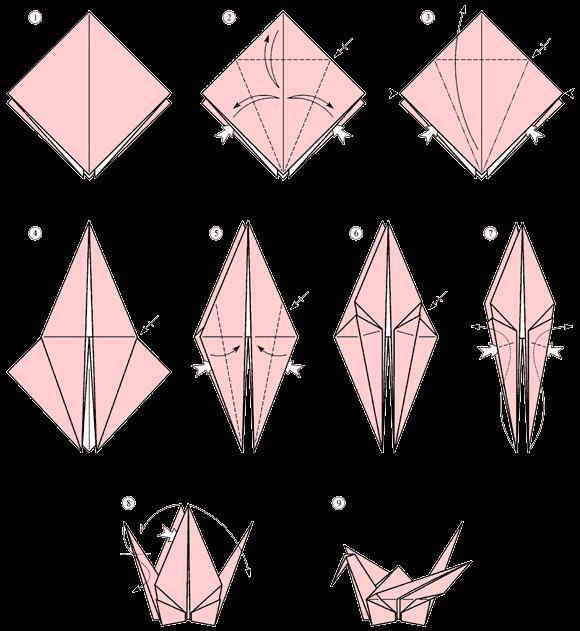
Procedure: 1. The crane is starting to fold from the base form. Square 2. Slide the layers of paper on the sides and make three folds: bend and extend the right and left edges, then bend and extend the top of the figure. I turn over, repeat the same with the other side; 3. Gently raise the upper layer of rhombus and bend it up. We do it by clicking on the sides. 4. We turn the shape, repeat the same with the other side; 5. Spread the paper layers on the sides and bending the sides of the face layer of the figure to the center; 6. We turn the figure with the other party and do the same as in the last paragraph; 7. Now push the layers of paper on the sides of the shape and wrap up the sharp lower ends up. Click on the sides, align the figure and flexing to the parties as you have already guessed, the nose and the tail of the caravel; 8. Bending a spray the nose, we are racing the wings and voila.
But other records!
Tags: Origami Animal Ham
All the January holidays have got up. And in February we are waiting for almost native holiday - Valentine's Day, or the day of all lovers, which is celebrated on February 14. In Russia, it is celebrated not so long ago, but it can be safely argued that everything is small from great, know the history of this holiday and its meaning.
It seems to me that the best gift is for the day of all lovers - made with your own hands. A gift made by your own hands allows you to understand and experience you and your partner value and individuality of your relationship.
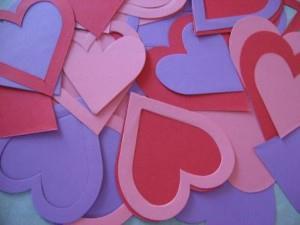
Gifts' ideas with their own hands on Valentine's Day Already, a huge amount can be found on the Internet. However, the indispensable attribute of the day of all lovers is "Valentine's", or simply, postcards in the form of hearts. Large, small, paper, fabric and even edibles - they are visible everywhere.
I suggest you learn how to make valentine's valentines yourself.
How to make Valentine do it yourself